Create A New Vendor Account
We recommend reviewing any current RESO specifications on their GitHub site. This will give you an understand of how RESO API works, as it’s a strict subset of Microsoft Web API. Any RESTful client can be used, but we do not recommend using services that store credential and data in third party storage. For example, Postman requires an account to save requests and
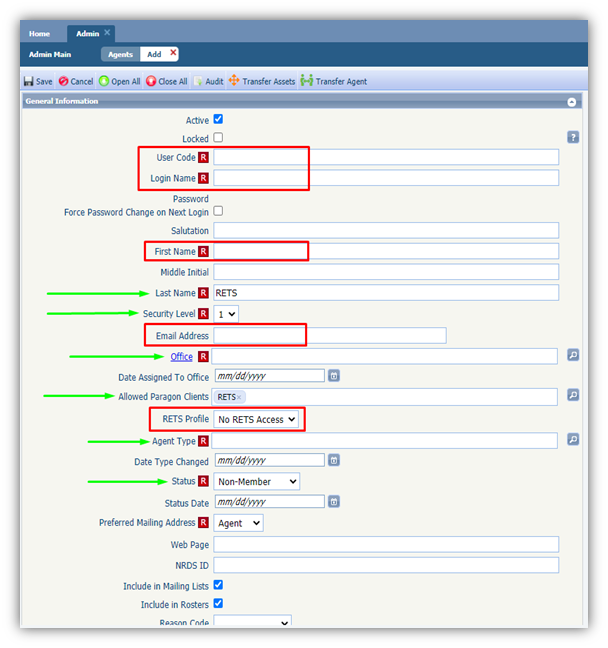
Quick Guide for Creating a New Vendor RETS Account
Green Arrows -> Items that can be filled out the exact same way for every vendor
Red boxes -> Items that will, for the most part, be similar or share a similar format for every vendor

Items to provide to a New Vendor so they can access the feed:
-
Login Name (Set by You)
-
Password (Set by You)
-
RETS URL (Provided by your SSM)
Fields that can change a vendor's access to data within RETS:
-
Security Level
-
Office
-
RETS Profile
-
Allowed Paragon Clients
Fields to help you stay organized and locate your vendor accounts more easily:
-
User Code
-
First Name
-
Last Name
-
Office
-
Agent Type
-
Status
Suggestions for Key Fields:
It's recommend setting this as the name of the vendor requesting the feed (without spaces). For example: ‘Realtor.com,’ ‘RealEstateWebmasters,’ ‘TheIncredibleMrLimpet’
It's recommend setting this to the exact same thing you entered for the User Code (it’s just easier that way)
This can be set to anything that will help you identify this account or vendor more easily down the road. You can make it the full name of the vendor requesting the feed, the office requesting the feed on behalf of their vendor, etc.
Like First Name, this can really be anything you’d like. Our recommendation is to set Last Name to “RETS.” By using “RETS” as the Last Name, you can quickly search for “RETS” on the Admin > Agents page to easily locate all your RETS vendors.
Always set Security Level to 1 for RETS accounts.
You will need to create the password that the vendor will be using to access the data feed. To help with that, put YOUR email address in the E-mail Address box. When you save the account, it will then send a password reset request to your email address. Simply click the link in the email within 3 hours to set the vendor’s password. You can then go back to the new account and replace your email address with the vendor’s email address.
Most of your RETS vendors are assigned to a RETS office (IDX Data Master), so it's recommend following that pattern to remain consistent.
The only client that’s necessary is the RETS client. All others can be removed.
You’ll want to select the RETS profile that provides the data that they are meant to have access to. Such as IDX Client [CORE], or whichever level you have an agreement with.
It's recommend selecting “RETS Vendor”
It's recommend selecting “Non-Member”
Setting the account password:
You will need to create the password that the vendor will be using to access the data feed. To help with that, put YOUR email address in the E-mail Address box. When you save the account, it will then send a password reset request to your email address. Simply click the link in the email within 3 hours to set the vendor’s password. You can then go back to the new account and replace your email address with the vendor’s email address.